Introduction to Git
Git is a powerful tool that permits parallel and asynchronous work while maximizing productivity and collaboration among team members. Despite the countless benefits Git offers, it requires time and dedication to learn and master. In this section, we will try to cover and define the most general Git concepts that may lead to misleading conclusions. Having an accurate understanding of these terms will notably facilitate your learning path. This section summarizes the content of different reviews and guides (highlighted throughout this page); we strongly encourage practicing the core Git utilities using this lab, which includes a beginner-oriented tour about the basic concepts you are working on.
The three stages of Git
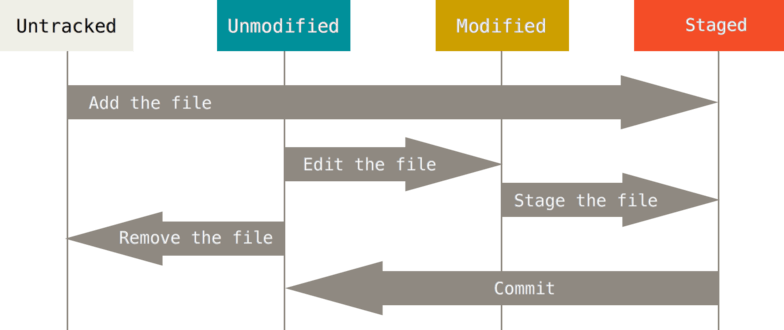
Three stages of Git.
Every file in a Git repository goes through three stages: modified, staged and committed.
Modified is the stage where you can add new features (or modifications) to the project. Changes are applied in the working directory (the Git tree in sync with your local machine), leaving unchanged the original code.
The second step is tracking modified files. The command
git add [files]updates the Git index using the givenfilesand pushes them to the staging area. Files included in this “space” are monitored by Git, notifying when new changes are applied. This area is the previous step to commit your latest modifications: it stores the changes that you want to include in the next snapshot.The last step consists in committing your modifications.
git commitrecords a snapshot of the changes kept in the staging area while creating a new timestamp in the history. Adding the option-mallows you to pass a commit message. Git maintains a record of all the commits made, generating a “timeline” with committed changes ordered in time. Sitting in a particular commit, all previous ones are called ancestors, usually designated with arrows in descriptive illustrations.
Remember
Files in a working directory can be in two states: tracked, files already present in the previous snapshot or added to the staging area, or untracked, files not present in the last commit and therefore not staged. Git will not include untracked files in the following historical snapshot until you explicitly add them. Git notices new modifications added to the tracked files.
Resources
You will discover more information and material about these concepts in the following links:
An introductory tutorial about the saving process in Git.
A (maybe too comprehensive) complete description of the recording process in Git.
Tutorial focused on the Git command
reset, the first part contains an enlightening description of Git’s internal state management system.
Commit, branches and heads
As previously mentioned, git commit is a daily command used to save the relevant changes in our repository. Git preserves a history of which commits were made and when; new commits arise from older commits (called parents or ancestors), which are used as a basis to build new commitments.
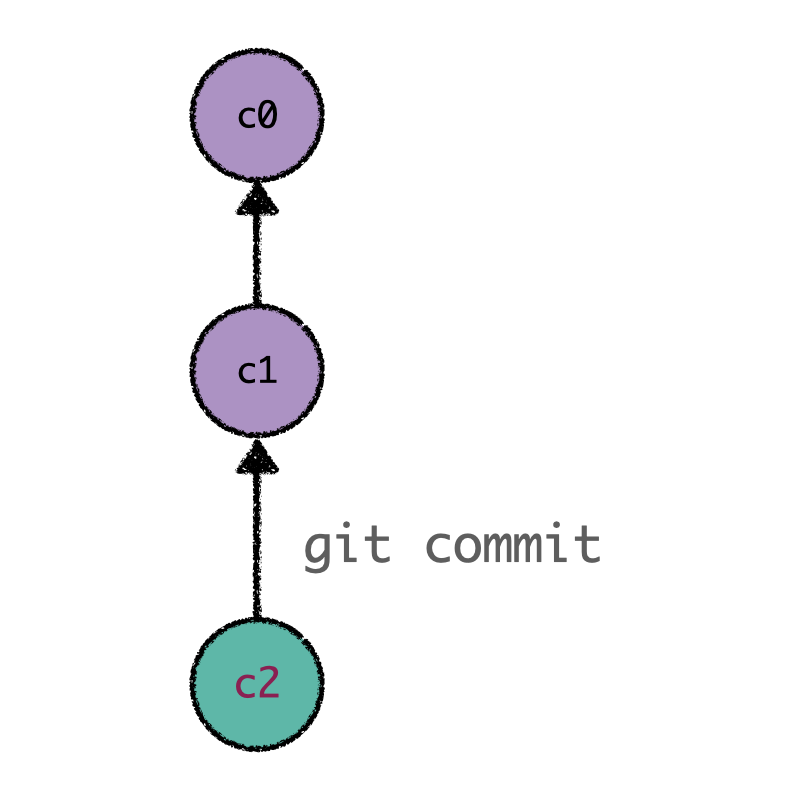
New committed changes are based off its ancestors.
Most VCS’s offer the possibility of creating secure “rooms” where you can play and test new
inclusions to your model. Contrary to other VCS’s (where these environments copy files from
directory to directory), Git branches are pointers to commits kept in Git
history. Branches are not new isolated copies of your project files (like a container for your
commits), but they are references to specific commits. Developers usually represent Git branches
as independent ramifications (or bifurcations) from the main development line. They are built
using the git branch command or git checkout -b.
Consider the scenario illustrated in the figure below, where you have committed a recent change.
When
using the command
git checkout -b new_feature (or git branch new_feature), you are creating a new pointer
labeled new_feature that refers to the last commit while maintaining the repository
unchanged. That being said, a natural question may arise: what is the usefulness of creating
a new reference? Although at first glance this operation might
seem useless, branches reach their full potential as we generate new commits.
Moving to the branch that we created (new_feature), subsequent commits (for example, c3) will
be referred to by
the latter. Once we have finished our task, we return to our principal branch (main) by
using the command
git checkout main (remember, branches are simply references; as illustrated in the figure, main
is a
tip pointing to the commit c2). Sitting on main, we will develop a ramification when
committing a new
change (in this case, called c4). Despite being conceived by the same commit c2, c3 and c4
are disconnected entities
that “exist” in different branches. If we come back to new_feature, we can make
further commits that depend neither on c4 nor on main. As mentioned at the beginning, we are
able to write new code without affecting the main development line.
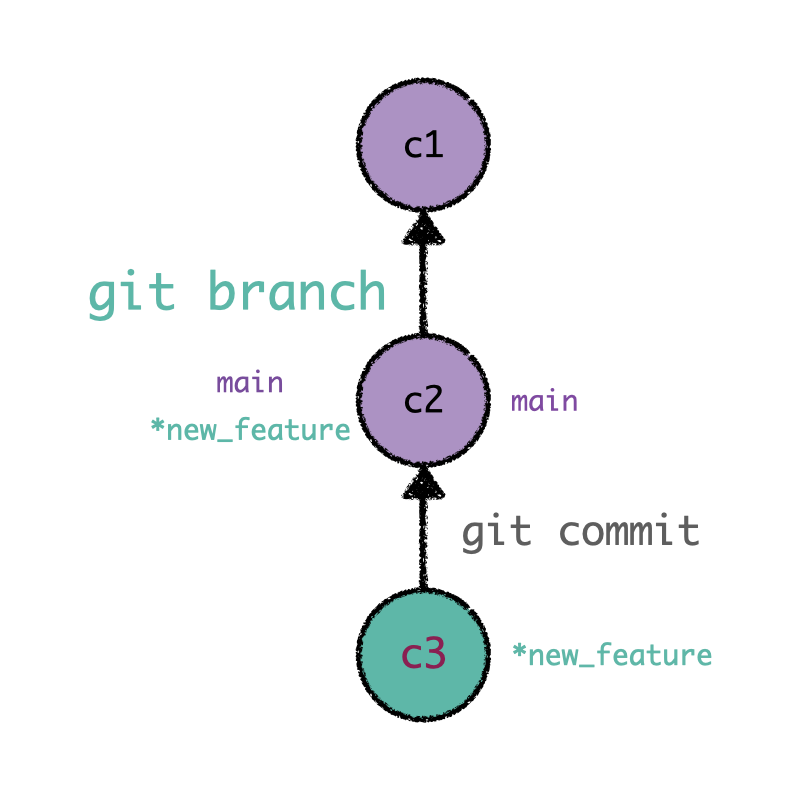
Branches are pointers to specific commits in Git history. Sitting on the commit c2
(which is referred to by
main), we can create a new branch named as new_feature. All subsequent commits (as
c3) will be
referred to by this newly created branch.
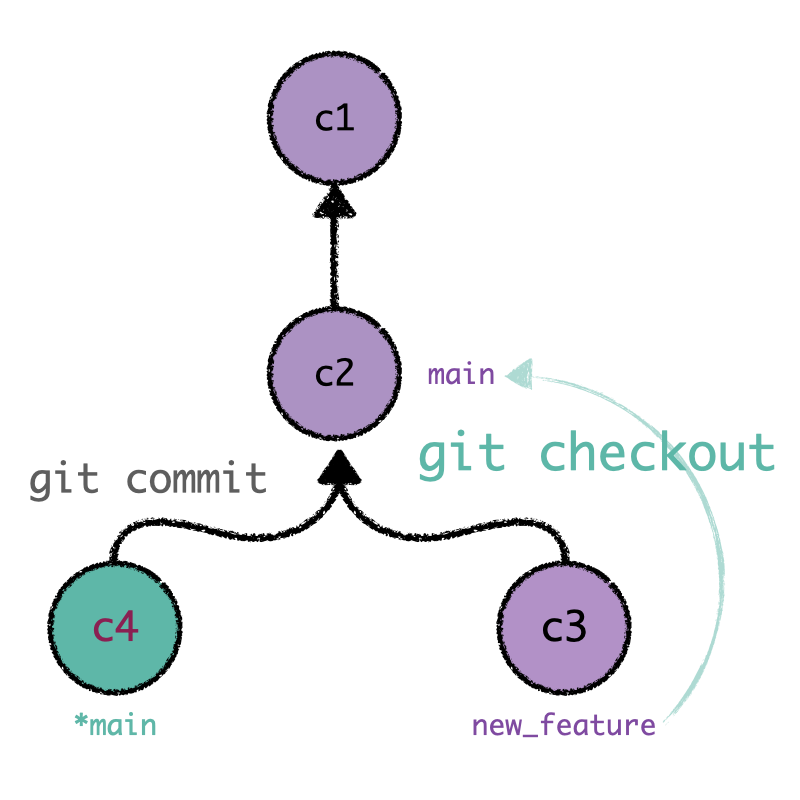
Once we have created the new commit c3, we go back to the branch main. A new commit c4
will generate a bifurcation or fork in the Git history. Commits from different branches (c3 and
c4) are disconnected.
Once we are satisfied with the changes made in our code, we can integrate the multiple
commits created in our supporting branch into the mainline by using git merge. This sentence
generates a dedicated commit that combines the development of the two branches (current and
target). Merge commits are unique as they are based on two parent commits. One should notice that
merge commits are produced in the current branch; git merge updates the source branch with the
modifications made on the target branch, leaving the latter unaffected.
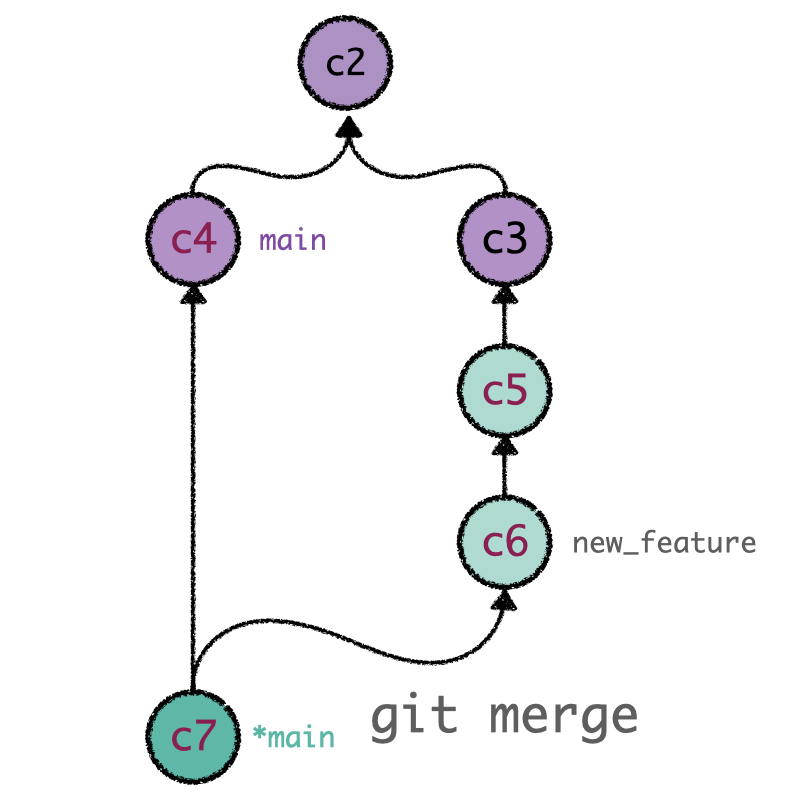
git merge generates a unique commit that unifies the two history lines.
Closely related to the fact that branches act as a pointer is the concept of HEAD. HEAD is the
name used to refer to the commit we are working on. It frequently points to the most recent commit.
We can change the position of HEAD by using
the command git checkout (actually, when you are applying this sentence for switching between
branches, what Git is doing is migrating the tip HEAD from one branch to the other). We can move
HEAD to a specific commit (and detached it from a branch) using the command git checkout plus
the label that identifies the commit. In the same way, we are able to move the position of a branch
by typing git branch -f [branch_name] [position].
Resources
If you are interested in delving into the ideas explored in this section, you should read the following links:
Joining histories
Once you have finished your work and the new modifications satisfy your criteria, you are in
position to integrate all these changes into the mainline of the project and share your thoughts
with your teammates. Git offers two primary utilities to incorporate novel code from one branch
into another, git merge and git rebase. Despite sharing a common goal, the methodology and
philosophy behind these two are very different.
Remember
Git branches are pointers to specific commits in Git history. They are not new repositories or folders.
Git Merge
The command git merge combines the content from two different branches into a single, unified
commit. The process is the following: git merge takes two branch pointers and identifies their
common commit ancestor. Once Git locates this point, it generates a unique “merge commit” (on
the branch we are currently working on) that combines all committed changes from their common
parent. This new commit is unique in the sense that it depends on two parent commits. One
should notice that git merge
only modifies the current branch; the target branch history remains unaltered (as illustrated in
the previous figure).
Git Rebase
git rebase is the second method used to integrate changes. Rebasing compresses the content of
the source branch into a single patch and integrates it on top of the target branch. In this way,
we transfer the finished work from one branch to another, rewriting and flattening the history. It
appears as if the entire sequence of commits had been created from start to finish on the same
branch, achieving a linear project history. Internally, what Git is doing is
replicating the commit sequence of the source branch onto the target base, creating new commits for
each commit in the original branch. The primary motivation for using git rebase is to achieve a
linear project history.
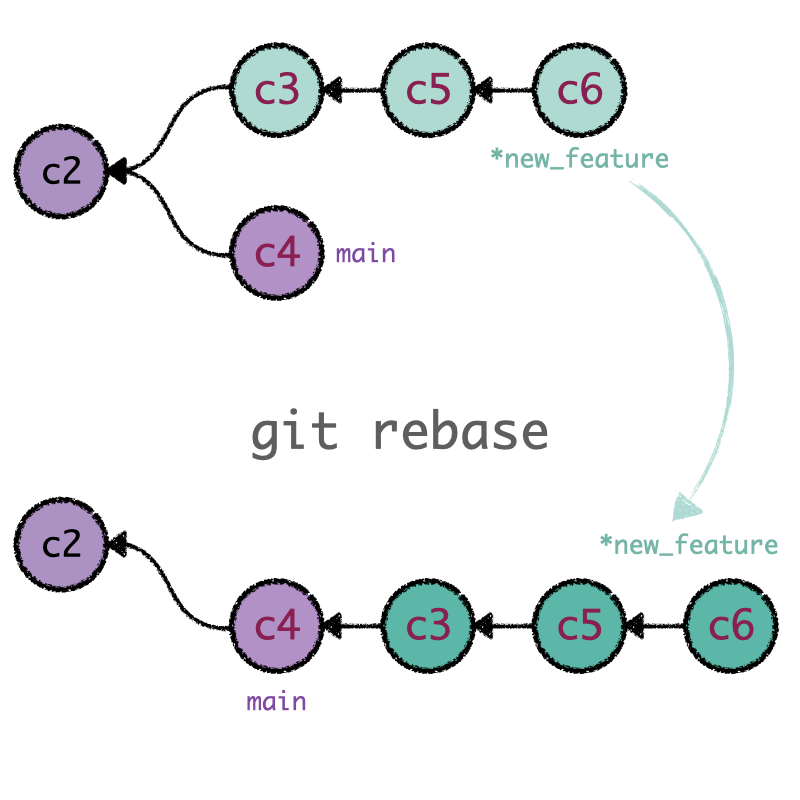
git rebase captures the content from one branch and reapplies it on top of the other. In that
way, rebasing changes the base of our branch to a different commit.
Good practices
An excellent exercise to avoid merging conflicts when pushing your content, either to the main
branch or to a remote repository, is rebasing your changes with the most recent version of main.
In this way, you guarantee that your changes are based on the most updated version of the
repository, facilitating the merging process.
Consider the following scenario: you have worked for several days on an additional feature for a program. Meanwhile, the mainline has been updated multiple times by your teammates, leaving your files obsolete. If you want to push your work to remote and open a Pull Request to merge your latest additions, a good practice is rebasing your content with the most updated version of the remote repository:
First, you have to download the remote main branch to include all these new modifications added by your colleagues:
git pull origin mainOnce you have your local main branch updated, you have to switch to your local working environment:
git checkout featureSitting on your branch, rebase your modifications with main:
git rebase main
Eureka! Now your branch is based on the remote main branch and it is ready to be pushed without any problem.
Git Rebase -i
An appealing option git rebase offers is the interactive mode. The flag -i initializes the
interactive mode, which allows you to rebase the commits individually as well as
modifying their properties. In this way, you can determine how the sequence of
commits is transferred to the new base.
Besides, this mode opens the door to rewriting your Git history by using the command
git rebase -i HEAD~ plus the number of commits you want to rewrite. With this command, instead
of rebasing against a distinct branch, you are “shifting” your base to the same point while
allowing you to remodel the structure of your commits. git rebase -i is extensively used (and
widely recommended) before pushing your modifications to remote; you can rectify your changes,
reorganize your history, and keep the number of commits to a minimum.
git rebase not only allows you to rewrite your history, but it reinforces the concept of
branches as pointers. Next to git rebase must always be a reference: either the label that
refers to an
individual commit (to rewrite your history), or a target branch to integrate your changes linearly.
Resources
You will be able to find more literature about merging utilities in the following links:
Tutorial about
git merge.In-depth tutorial about
git rebase, including the interactive mode.Conceptual discussion about the two merging strategies.
Immerse in the most complete source about Git.
We encourage to exercise
mergeandrebasetools by using the interactive tutorials.
Rewriting history
Before pushing your modifications to your shared repository, having a clean, organized history is
strongly recommended to help the reviewing process to your comrades (and, of course, to facilitate
your understanding of the working flow). Git offers multiple workflow customization tools that give
you total control over the project development. We mentioned git rebase -i, but there are more
options to restructure your Git commits, such as git commit --amend. These
two essential references contain
everything you should know about history-rewriting commands. These sources expose the topic in
such a precise and straightforward manner that we are unable to include something relevant to the
discussion.